How To Make Tornado In A Bottle
Answer: Yes, I can definitely help you with that. Here’s an engaging long-form article on how to make a tornado in a bottle.
Have you ever wondered how tornadoes form and what causes them? While it’s impossible to recreate a real tornado, you can create a mini version of it with a simple experiment – the tornado in a bottle! This fascinating science experiment is not only educational but also lots of fun. In this article, we will walk you through the steps of making a tornado in a bottle and explain the science behind it.
Materials You’ll Need
Before we get started, let’s gather all the materials you’ll need for this experiment. Don’t worry, you won’t need any fancy or hard-to-find equipment. Most of the items can be found around your home or easily purchased at a local store. Here’s what you’ll need:
1. Two clear plastic bottles with caps (500 ml or 1-liter bottles work best)
2. Water
3. Dish soap
4. Glitter or food coloring (optional)
5. Duct tape or hot glue
6. Scissors
Creating the Tornado Effect
Now that we have all the materials, let’s dive into the steps of making the tornado in a bottle. Follow the instructions below and watch as the swirling vortex begins to form right in front of your eyes!
Step 1: Prepare the Bottles
Take two clear plastic bottles and remove the labels. Make sure the bottles are clean and dry before proceeding. You can use either 500 ml or 1-liter bottles, depending on the size you prefer.
Step 2: Fill the Bottles
Fill one of the bottles about three-quarters full with water. Leave some space at the top to allow for the swirling motion. You can add a few drops of food coloring or glitter to the water if you want to make the tornado more visible and colorful.
Step 3: Add Dish Soap
Add a small amount of dish soap to the water in the bottle. The soap will act as a surfactant, reducing the water’s surface tension and allowing the vortex to form more easily. Don’t use too much soap, as it may cause excessive foam.
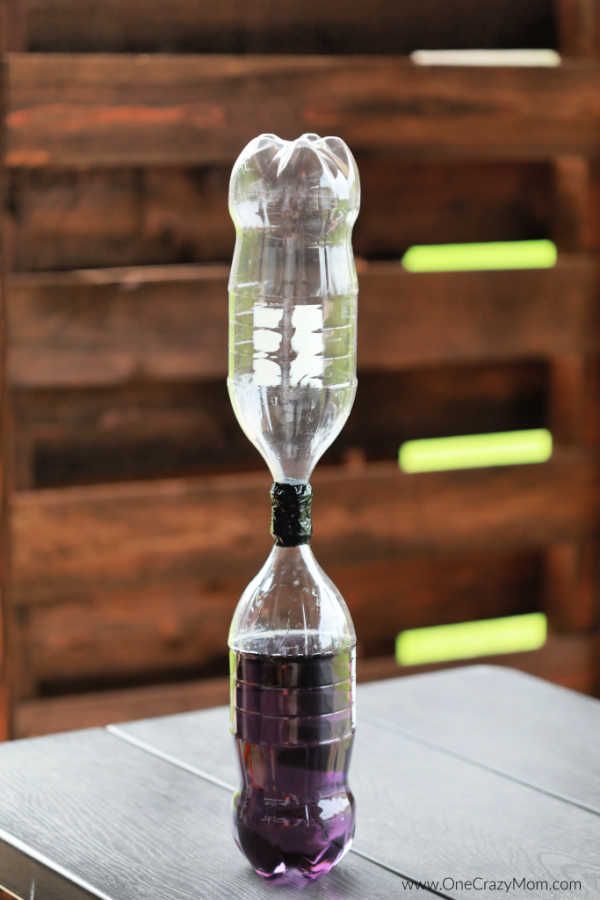
Step 4: Connect the Bottles
Take the second bottle and carefully invert it, placing the mouth over the mouth of the first bottle. Make sure the mouths of the bottles are aligned and tightly sealed to prevent any leakage. You can use duct tape or hot glue to secure the connection.
Step 5: Create the Tornado
With the bottles connected, hold them firmly in an upright position and start swirling them in a circular motion. You’ll notice a small vortex forming in the water as it flows from one bottle to the other. Keep swirling the bottles for a few seconds, and soon you’ll have a mini tornado right in your hands!
The Science Behind the Tornado
Now that you’ve successfully created a tornado in a bottle, let’s understand the science behind it. Tornadoes in nature form when warm, moist air collides with cool, dry air, creating an unstable atmosphere. In our experiment, the swirling motion creates a similar effect by creating a vortex in the bottles.
When you swirl the bottles, the water starts flowing from one bottle to the other. This movement creates a pressure difference between the inside and outside of the bottles. As the water flows faster, it forms a vortex, similar to a tornado. The air in the center moves upward, drawing in the surrounding air and creating a rotating column of water.
The addition of dish soap reduces the water’s surface tension, allowing the vortex to form more easily. It also helps to create a swirling motion that resembles a tornado. The food coloring or glitter adds a visual element to the experiment, making the tornado more visible and exciting to watch.
Frequently Asked Questions
Q1: Can I use any type of plastic bottles for this experiment?
Ideally, you should use clear plastic bottles for this experiment as they allow you to see the tornado forming. 500 ml or 1-liter bottles work best, but you can experiment with different sizes to see how it affects the vortex formation.
Q2: Can I use other liquids instead of water?
While water works best for creating the tornado effect, you can try using other liquids to see how they behave. For example, you can use colored water, oil, or a mixture of water and oil. Just keep in mind that different liquids may have different properties and may not create the same swirling effect as water.
Q3: Can this experiment be done without dish soap?
Dish soap is not essential for creating a tornado in a bottle, but it does help enhance the effect. The soap reduces the water’s surface tension, allowing the vortex to form more easily. However, if you don’t have dish soap on hand, you can still create a vortex using water alone. Just keep in mind that the effect may be less pronounced.
Final Thoughts
Making a tornado in a bottle is not only a fun and engaging activity but also an excellent way to understand the science behind tornado formation. By observing and experimenting with the swirling motion of water, you’ll gain insight into the principles of fluid dynamics and vortex formation. So go ahead, gather your materials, and start creating your very own tornado in a bottle – a scientific wonder right at your fingertips!
Whether you’re a curious student, a science enthusiast, or just looking for a fun experiment to do with your kids, the tornado in a bottle is sure to captivate and educate. So get ready to unleash your inner scientist and have a whirlwind of fun with this fascinating experiment!